• My Account
  • Shop Themes
  • Cart
  • Skip to main content
  • Skip to footer
  • Get Started
  • Shop Themes
    • Premium WordPress Themes
    • Simple WordPress Themes
    • Upgrades
    • Theme Installation
    • Theme Package
  • Lookbook
  • Services
    • Theme Installation
    • Customizations
  • FAQ
  • Theme Support
    • Tutorials
    • Theme Setup & Documentation
    • Video Library
  • Shop WordPress Themes
  • Cart

17th Avenue Designs

Feminine WordPress Themes for Bloggers & Entrepreneurs

  • Start Here
  • Shop
    • Premium WordPress Themes
    • Simple WordPress Themes
    • Upgrades
    • Theme Installation
    • VIP Theme Package
  • Lookbook
  • Home
  • Services
    • Theme Installation
    • Customizations
  • FAQ
  • Support
    • Tutorials
    • Theme Setup & Documentation
    • Video Library

Tutorials

The Quick + Easy Way to Start a WordPress Website

in: Tutorials, Wordpress Tips

So… you’re thinking about starting a website.

Maybe it’s a blog you’ve been dreaming about for years. Maybe you’re launching a business and need a polished online presence. Or maybe you’re simply feeling the pull to create something of your own and share it with the world.

Whatever your reason, we’re cheering you on! That spark of an idea is all it takes to get started. And if you’ve ever opened a tab to figure it all out and immediately closed it because… domains? hosting?? what even is WordPress??? You’re definitely not alone!

Here’s the great news: it’s not nearly as complicated as it sounds. In fact, with the right tools and a little guidance, you can have your site up and running in less than 30 minutes (really!).

In this post, we’ll walk you through exactly how to:

  • Choose the right website platform (spoiler: it’s WordPress!)
  • Purchase your domain and hosting
  • Install WordPress in just a couple clicks
  • Pick a WordPress theme that brings your vision to life
  • Launch your site with clarity + confidence

Grab a cup of coffee and let’s dive in. Your dream website is closer than you think!

Step 1: Choose WordPress (Here’s Why)

WordPress powers over 40% of all websites online, and for good reason! It’s beginner-friendly, endlessly customizable, and gives you full control over your content, your design, and your future. Whether you’re starting a personal blog or building an entire brand, WordPress can grow right along with you.

Bonus: WordPress is free to use, forever. 🙌

But here’s the catch: there are two versions of WordPress, and they’re not the same.

WordPress.org vs. WordPress.com: What’s the Difference?

  • WordPress.org is what we recommend. It’s the self-hosted version that gives you full flexibility, plus the ability to install themes and plugins. Most of the time, if someone is talking about “WordPress,” they’re referring to WordPress.org. It’s what our themes are built for, and what we’ll walk you through in this guide.
  • WordPress.com is a limited hosted platform that doesn’t support custom themes or plugins (even on paid plans). You don’t have as much control, and most features require upgrades.

Bottom line: You want WordPress.org. It’s more powerful, more flexible, and gives you full control over your website, including the ability to use themes and plugins so you can make your site truly your own!

Step 2: Get a Domain & Hosting

Now that you’ve chosen WordPress, it’s time to grab two essential ingredients:

  • A domain name (your website’s address, like yourwebsite.com)
  • A hosting plan (a virtual space to store your website files)

What’s the difference?

Think of your domain as your street address and your hosting as the house itself. You need both to create a website that people can actually visit!

Our Hosting Recommendation: SiteGround

After working with dozens of hosting companies over the years, our pick is hands-down SiteGround.

They offer:

  • ⭐ Amazing customer support (seriously, they’re the best!)
  • ⚡ Fast, reliable servers (hello, speedy site)
  • 💰 Fair pricing with transparent features
  • ✨ Beginner-friendly tools that make setup easy

And we don’t just recommend them… we’re customers, too! We use SiteGround for several of our business domains.

How to Set Up Hosting with SiteGround

1. Go to SiteGround.com.

2. Choose the StartUp plan (perfect for new websites).

3. Enter the domain name you want. If you already own one, select “I already have a domain.”

4. Fill out your account details and payment info.

💡 Tip: Add Domain Privacy to keep your personal info private!

5. Click Proceed to Customer Area and verify your domain via email.

And that’s it, simple as that! You now officially have a domain and a place for your website to live.

Step 3: Install WordPress (It’s Easy, Promise)

SiteGround makes installing WordPress super simple. Here’s how:

  1. Log into your SiteGround account.
  2. Click the Websites tab at the top.
  3. Click Select under “Start New Website.”
  4. Choose WordPress.
  5. Enter your desired email and password (this will become your WordPress login).
  6. Click Finish.

🎉 Done! WordPress is now installed and your site is ready to be customized.

How to Log In to WordPress

You can log in any time by typing: yourdomain.com/wp-admin

Use the login info you just created, and boom, you’re in your WordPress dashboard!

Step 4: Choose a Theme You Love

Here comes the fun part: picking a theme to bring your website to life.

At 17th Avenue Designs, our themes are thoughtfully crafted to be:

  • 💻 Easy to use (even for beginners!)
  • 🎨 Gorgeous and modern
  • ⚙️ Fully customizable with the WordPress Block Editor
  • 📱 Mobile responsive and lightning-fast

Whether you’re starting a cozy lifestyle blog, a bold personal brand, or launching a new business, we’ve got a theme that will fit your style + goals.

Shop WordPress Themes

We make it easy to get started, no matter your experience level. If you’d rather skip the setup and dive straight into your content, our professional installation services are a great hands-off option.

Prefer to do it yourself? You’ll have access to step-by-step tutorials in our Support Center to guide you through installing and setting up your theme. Your purchase also comes with access to our WordPress Video Library, where you’ll find helpful videos on WordPress basics — a great resource if you’re just getting started. No matter your comfort level, we’re here to support you every step of the way.

Step 5: Set Up & Launch Your Website

Now that WordPress is installed and your theme is in place, it’s time to start bringing your vision to life!

Here are a few key things you’ll want to do next:

  • Customize your theme: Adjust your site’s colors, fonts, and layout to reflect your brand and style.
  • Install essential plugins: These add helpful features to your site, like contact forms, SEO tools, image optimization, and more. (We’ll share a few favorites below!)
  • Create your core pages: Most websites start with a homepage, about page, blog, and contact page. You can always add more later, but this gives you a solid foundation.
  • Write your first blog post or add your first product/service: Start filling your site with the content you’re excited to share!

Need a little help along the way? WordPress can have a bit of a learning curve at first, but once you get the hang of it, it becomes second nature. There are plenty of tutorials online (our Support Center is a great place to start!) and chances are, if you have a question, someone else has already asked + answered it.

Once your site looks just the way you want it… Pop the champagne and press publish. You did it!

Bonus: Must-Have Plugins for Your New Website

Think of plugins like apps for your website. They add extra features and functionality without needing to code them yourself. Here are a few beginner plugins we recommend for every site:

Yoast SEO

Yoast SEO helps you optimize your content so it can be found on Google. Super beginner-friendly, with tips and checklists built in.

Kadence Blocks

If you’re using a Kadence theme, Kadence Blocks is a must! It gives you more design flexibility in the WordPress Block Editor (think: accordions, forms, testimonials, image galleries, and more).

SG Optimizer or WP Rocket

If you’re using SiteGround, SiteGround Speed Optimizer is a great performance plugin designed specifically for their hosting platform. For all other sites, we recommend WP Rocket, a powerful caching plugin that improves speed, reduces load times, and helps your site run smoothly. Both are beginner-friendly and make a big difference in overall performance.

UpdraftPlus

UpdraftPlus creates automatic backups of your site behind the scenes. If anything ever goes wrong, you’ll be so glad you installed this.

Antispam Bee

Antispam Bee blocks spam comments so your blog doesn’t turn into a junkyard. Trust us on this one.

💡 Tip: When it comes to plugins, quality matters more than quantity. Stick to well-reviewed, reputable plugins from trusted developers, and try to only install what you truly need. Too many plugins can slow down your site or cause conflicts, so it’s always a good idea to keep things lean, clean, and purposeful.

Final Thoughts

Starting a website might feel overwhelming at first, but once you break it down, it’s completely doable, and so worth it! You don’t need to be tech-savvy. You just need a little guidance and the right tools (WordPress + SiteGround + a theme you love = the perfect combo).

You’ve got everything you need right here. So go for it. Your dream website is waiting. ✨

Filed Under: Tutorials, Wordpress Tips

How to (Properly) Use Categories & Tags in WordPress

in: Tutorials, Wordpress Tips

Categories and tags can often be a bit of a mystery to bloggers new to WordPress. Are they really that important? (Yes!) How am I supposed to use them? Even if you’ve been blogging for some time, you may not fully understand the underlying purpose of categories and how to properly implement them.

In this post, we’ll cover the differences between categories and tags, why they are so important, and how to use them on your site!

There are two distinct ways to organize your posts on your WordPress site: Categories and Tags. Using categories and tags correctly can boost your SEO, keep visitors on your site longer, and provide an overall better experience for your readers.

WHY ARE CATEGORIES & TAGS IMPORTANT?

The primary purpose of categories and tags is to organize your posts to help readers navigate your site and find the content they want to read. Whenever someone clicks on a category in one of your blog posts, they are directed to a category page that contains all of the posts that have been assigned that same category. A bloated site with 50 unrelated categories is going to be complicated and difficult to navigate.

In addition to making your site more usable for readers, utilizing Categories and Tags correctly can have significant SEO benefits. Sites that are organized and structured will have a much easier time rising in the ranks of Google search.

By learning what Categories and Tags are for and how they work, you can leverage them to your advantage and make your site easier to navigate for both readers and search engines.

CATEGORIES VS. TAGS

Categories are the big general topics that you write about regularly on your blog. They’re meant to encompass a broad group of posts — for example, “Recipes” or “Style.”

Tags, on the other hand, are much more specific and are used to describe details in your posts. Tags can often fall into multiple categories, similar to the index of a book.

BEST PRACTICES FOR CATEGORIES
  • The best time to start thinking about your categories is before you even start blogging! It can be difficult to majorly change up your categories later, so it’s good to start off on the right foot. Sit down and think carefully about the topics you are going to write about on your blog. Try to narrow it down to 6-10 categories.
  • The categories on your site should be broad enough that each post will only fit into one or possibly two categories. If that’s not possible, then your categories are probably too specific.
  • If you need to, use sub-categories. Sub-categories are particularly useful for food blogs, but they can definitely be used in other applications as well. A food blog could have a main category of “Recipes” and sub-categories of Breakfast, Dinner, Soups, Desserts, and Drinks.
  • Avoid creating new categories as you go; it’s best to plan in advance what categories you are going to use on your site. If you are only going to write about a topic once or twice, do not create a entire category for it — use tags instead!
  • It is best practice to capitalize categories.
BEST PRACTICES FOR TAGS
  • You can be much more liberal with tags than you can with categories, but you should still keep them general. Don’t create tags that can be used for only one post — that defeats the purpose of tags, which is to help your readers navigate to similar content.
  • Use descriptive tags that describe the specifics of your posts, but be sure they can be used in other posts as well. For example, if you posted a recipe for “Cajun Fish Tacos,” you could use the tags mexican, 30-minute meals, and healthy. Don’t use a tag called “cajun fish tacos,” because you won’t have multiple posts that could use that tag.
  • It is best practice to keep tags lowercase.
AN EXAMPLE OF CORRECT POST ORGANIZATION

If you run a fashion and lifestyle blog, you might use these six categories:

  • Style
  • Travel
  • Food
  • Health & Fitness
  • Home Decor
  • Lifestyle

If you wrote a post about a new outfit in the Style category, these would be good tags (as long as you plan to post about them again): dress, sandals, kate spade, handbag, sunglasses, spring looks.

These would be much less effective tags, because they are too specific: pink floral print dress, michael kors sandals, white cat-eye sunglasses, madison satchel by kate spade, april 2017 outfit

Using Categories & Tags on your WordPress site

CREATING NEW CATEGORIES AND TAGS

To create new Categories, go to Posts > Categories in your WordPress dashboard.

Tags are usually added to a post at the time you write them. They can also be managed in your dashboard at Posts > Tags.

USING CATEGORIES IN YOUR POSTS

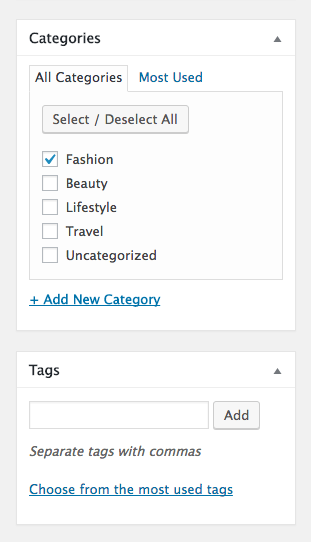
When in the post editor, look for the “Categories” section in the righthand column. Place a checkmark by the category or categories you want to use. Tags can be managed below the Categories section.

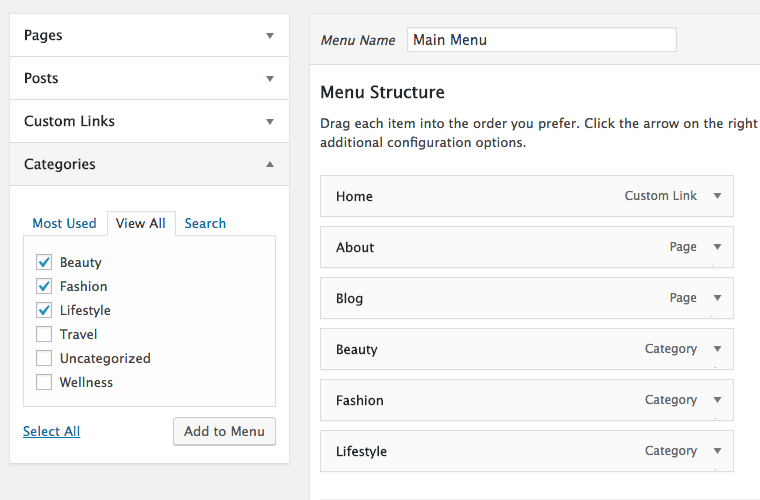
ADDING CATEGORIES TO A NAVIGATION MENU

Go to WordPress > Appearance > Menus. To add categories to your navigation menu, click the Categories tab in the left column. Place a checkmark by the categories want to add. Then click Add to Menu.

The categories you added will appear in the column on the right under Menu Structure.

WRAPPING UP

Categories and tags are excellent organizational tools that you can use to keep your site clean and easy to navigate, which your audience will appreciate! The more helpful your site is, the more your readers will want to keep coming back for more.


Filed Under: Tutorials, Wordpress Tips

Footer

Browse

  • Get Started
  • Shop Themes
  • About Us
  • Contact
  • Support
  • Account Login
  • Testimonials
  • Resources
  • The Blog
  • Become an Affiliate
  • Changelog

Join the List

Sign up and be the first to know about exclusive sales, theme releases, & more!

Copyright © 2025 · 17TH AVENUE · TERMS & CONDITIONS · PRIVACY